Showing posts with label bread. Show all posts

March 01, 2013

French Dip


Oh hey there! Where ya been? ...oh, wait, that was me. Awkward... In all honesty I've been taking the easy way out for the last little while. I still have the a bunch of recipes and photos from the last few months but I've just been too lazy to post. AND... no lie, the babe is kind of preoccupying my mind lately, can you blame me? Motherhood is going to be a huge, crazy, terrifying change and I'm kind of obsessed with planning out my life. SO... the good old blogola fell off my radar. 

Now I'm back with a super duper easy recipe. First you'll need to whip up a batch of my favorite Crusty Artisan Bread  and just break it down into 4- 6 smaller loaves. Easy right?

INGREDIENTS:
Good deli roast beef  (I like mine more on the rare side)
Sandwich sliced provolone cheese or swiss cheese
I pkg Au jus 

Optional:
Butter 
Horseradish
Mayo
A small pinch of thyme and garlic thrown into the au jus

RECIPE:
Follow directions for Crusty Artisan Bread. Instead of making two larger loaves make 4 - 6  smaller loaves. Make sure when you form your loaves you make them into a submarine shape so you can have a good size sandwich.

Cook au jus on stove top per package directions,set aside.

When bread is finished baking and mostly cooled slice in half and load it up with roast beef and cheese (and if you want some butter on the side of the bread without meat, do it to it!) then place under your broiler until cheese is melted and bubbly. 

Serve hot and thank me later. 
Ps. Because we were having a super healthy evening I may have made some shoe sting french fries. Totally delicious and oh so right.

Notes: You don't have to make the bread. Instead you could buy some and toast it up really good - but, seriously, the homemade bread really makes it special. 

Recipe: The Gregarious Glutton, Crusty Artisan Bread

November 12, 2012

Crusty Artisan Bread


If you can't tell I LOVE to bake, especially bread. There is just something about the smell that fills the entire house and the finished product is always to. die. for. It's the one thing I feel that I can consistently do right. It also helps that bread is made with simple ingredients that I always have handy.  

Yields 2 loaves

INGREDIENTS:
3 cups lukewarm water
1 1/2 Tbsp instant yeast
1 Tbsp salt
6 1/2 cups all purpose flour, plus some for dusting

DIRECTIONS:
In a large bowl mix yeast and salt into 3 cups of lukewarm water. Stir in flour, mixing until combined.  Dough will be very loose, don't worry, it's supposed to be this way.  Cover lightly with a kitchen towel. Let the dough rise at room temperature 2 hours up to 5 hours. 

After the dough has risen you can either bake or refrigerate for later.

To refrigerate: Cover in an airtight container, for as long as two weeks. When ready to bake, divide dough in half to form your first loaf. Form a loaf by stretching the dough over itself, creating a smooth top and a lumpy bottom. Place dough on sprayed parchment paper and let rest for 1 1/2 hours. 

To Bake: Divide dough in half to form your first loaf by stretching the dough over itself, creating a smooth top and a lumpy bottom. Place dough on a sprayed parchment paper and let rest for 40 minutes.

To Prepare you oven: place a broiler pan on the bottom rack of the oven (I only had a metal cake pan- that works fine DON'T USE GLASS). Place a baking stone on the middle rack and preheat oven to 450 degrees F. Heat stone at 450 degrees F for 20 minutes before baking.

After the dough has rested and is ready to bake, dust the dough lightly with flour , slash the top with a serrated or very sharp knife three times. Slide the dough (with the parchment paper) on to the hot baking stone. Pour one cup of hot water into the broiler pan and shut the oven quickly to trap the steam. Bake the bread until well browned, about 24 -28 minutes. Cool completely.

If you don't have a baking stone, try turning a rimmed baking sheet upside down and heating it in the 450 degree F. for 10 minutes prior to baking.  Bake for 20 - 22 minutes. 

Notes:
I have made this recipe 3 times  (in the last two weeks) and it is great! I have put a fully baked loaf in the freezer and used it on nights when I don't have time to make something after work. After thawing I pop it in an oven heated to 350 degrees F. for about 10 minutes and the crust will crisp up again and the inside will be be soft and warm. 

I have also baked the bread a day in advance, let it cool then store in a gallon bag. Then I will pop it in an oven heated to 350 degrees F. for about 10 minutes and the crust will crisp up again and the inside will be be soft and warm. 

Leftovers: If you have any... It makes a delicious french toast the next morning! I'm sure that if I let it sit out for a few days it would also make some tasty croutons.

What I've used it for: Panini sandwiches, french toast, great with soups, killer garlic bread! (more uses to come I'm sure.)

October 18, 2012

How I make friends - Amish Friendship Bread

This bread is everywhere this time of year. The reason it is called friendship bread is because it requires a bread start and every ten days you split your start into four new starts and make bread (see notes).  Then you share your extra starts with your friends. I make friends by sharing the already baked bread. Seriously, no one can resist the comforting cinnamon/spice flavor of this sweet bread; it's like fall in your mouth. 

Anywho, this bread is dangerously addictive!! My family sometimes calls it Devil Bread because they just can't turn it down. 

First things first, you'll need a start. You could find a friend who wants to share or you can start your own.  I have started my own the past couple years and it works great. 

STARTER INGREDIENTS:
1 pkg active dry yeast
1/4 cup warm water
1 cup all purpose flour
1 cup white sugar
1 cup warm milk

DIRECTIONS:
In a plastic or glass bowl (no metal) combine flour and sugar, mix. 

In a smaller bowl dissolve yeast in warm water until foamy, about 10 minutes. When the yeast is foamy add warm milk, then combine with the flour and sugar mixture. Mix well and pour into a gallon sized plastic bag, seal and lay flat on your counter (Do not refrigerate). This is Day 1.

During days 1 - 10 the batter will thicken, bubble and ferment. If air fills the bag just squeeze it out.

Day 1: Do nothing. Place bag on a flat surface.
Day 2: Squeeze bag several times.
Day 3: Squeeze bag several times.
Day 4: Squeeze bag several times.
Day 5: Squeeze bag several times
Day 6: Add 1 cup flour, 1 cup sugar, 1 cup milk to bag. Seal and then squeeze bag to mix.
Day 7: Squeeze bag to mix. 
Day 8: Squeeze bag to mix.
Day 9: Squeeze bag to mix.
Day 10:  In a large non-metal bowl, combine batter with 1 cup of flour, 1 cup of sugar and 1 cup of milk. Mix with a non-metal spoon/spatula. Pour 4- 1 cup starters into 4 one-gallon zip-lock bags. give these away with a copy of the instructions. There will be about 1 cup left of batter remaining in the bowl. To the left over batter add the 'bread ingredients'. 

Then, if you keep a bag of starter for yourself start again at day 1.

BREAD INGREDIENTS:
3 large eggs
1 cup vegetable oil
1/2 cup milk
1 tsp. vanilla
1 cup sugar
2 cups flour
1/2 tsp. baking powder
1/2 tsp. baking soda
1/2 tsp. salt
2 tsp. ground cinnamon
1 large box of instant vanilla pudding
1 cup starter

For the pan: 
Cooking spray
Mix together:
1/3 cup sugar +1 1/2 tsp cinnamon, divided

DIRECTIONS:
Preheat the oven to 350 degrees F.
Prepare your bunt pan or bread pans by spraying with cooking spray. My favorite is Bakers Joy. Then,while the cooking spray is still wet, dust your pan(s) with 1/2 of the cinnamon and sugar mixture.  If you are using a bunt pan make sure you cover it completely- including the flute. 

Mix all of the bread ingredients together in a non-metal bowl until well combined. The batter will be thick. pour into your pan and sprinkle the top of the bread with the more of the cinnamon sugar mixture; you may end up with extra cinnamon/sugar- no biggie, save it for next time.

Bake at 350 for 1 hour.

Notes: 
After a while you are going to run out of friends to give it to or maybe you don't want to share it until someone asks you (like me). So, I'm going to tell you a big secret... you don't have to follow the ten day rule, you have options!  After the 'goo', as I lovingly call it, starts to ferment and bubble you are good to go. Just make sure to squeeze the bag daily and feed it with equal amounts of sugar, flour and milk at least once a week. When I want to keep mine growing without creating tons of starter/goo I add 1/4 cup of sugar, milk and flour.

Another misconception about the ten day rules is that you can't bake with it right after you add the sugar, flour, milk combo. False, if you know you are going to be baking a bunch of loafs add a cup of each one day and then bake it the next day. You'll have tons of goo all to yourself. Happy baking! 

Lets talk about the starter. It's stinky... really stinky. If it smells rotten that's a good sign. It should bubble, stink and fill the bag with air. 

Here are some examples of what things are going to look like:
                          Day 1                                        Day 3                                      Bread Day

If you have any questions please email me: Casscooks@gmail.com and I'd be happy to help. (it can be confusing) 

You can also switch up the flavors of your bread by adding different pudding flavors, nuts, dried fruit, chocolate chips etc.  My Mom has added pumpkin and chocolate chips before and it turns out great! Experiment and have fun!

Starter Recipe: Cooks.com
Bread Recipe: Passed from friend to friend. 

October 13, 2012

The Greenery's Famous Mormon Muffins

Only 2 of the 4 muffins in this picture survived...the photo shoot. I'm unashamed.

Where I live there is this awesome little place called Rainbow Gardens. My family and I have been going to Rainbow my whole life. My dad even went when he was a kid (swimming). Over the years this Ogden landmark has gone through drastic changes. You may now scroll down to the recipe or get a quick history lesson...Ready? Go...

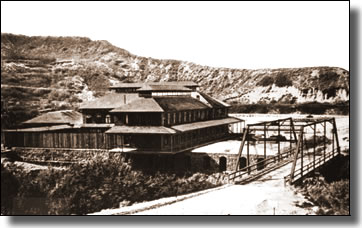
Originally in 1895 the resort was built boasting amenities that included mineral baths, hotel, dinning rooms and dance halls. It later burned down in 1927. 

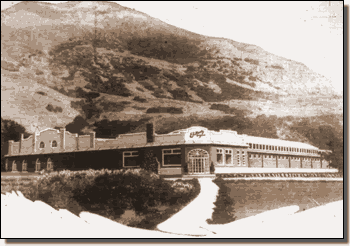
In 1928 an entrepreneur bought and rebuilt the resort - this time in brick; it was renamed "El Monte Springs" This time around the resort featured mineral baths, a 100,000 gallon swimming pool and a grand ballroom.  Unfortunately the Great Depression put an end to El Monte and it shut it's doors in 1932.

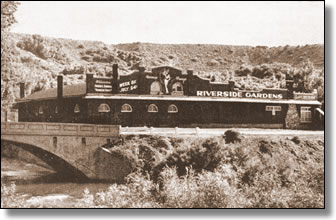
In 1946, Ogden's Cowboy, Mayor Peery purchased the dormant building and he renamed it Riverside Gardens. It was once again used for swimming and dancing.

In 1946, the resort was turned over to the Mayor's son-in-law and daughter (the King family). The Kings changed the name one last time to Rainbow Gardens. They began restoration on the Victorian spa and for 25 years Rainbow Gardens operated as a resort that featured indoor swimming pools, a ballroom and 18 bowling lanes.

In 1970 Rainbow Imports was opened in the ballroom. It featured gifts from all around the world. In 1975 the swimming pool was renovated and turned into the sunken "Gift Garden". The following spring The Greenery Restaurant opened, and remains open to this day.

In 1996 Rainbow Lanes Bowling was turned into Planet Rainbow another gift shop featuring one of  Utah's largest collection of 'Utah Books', regional souvenirs and gifts.

Today, Rainbow Gardens is still owned by the King family and thrives with good food, gifts and fun.
Photo/info credit:Rainbow Gardens

The end.  Phew, you're thinking...Gee thanks, can we get to the recipe now? Nope.

I love this place! When I was young my Dad and I always went bowling, I even had my own ball with my name on it! We were so sad when it was shut down. Rainbow was the first place that my score broke 100! I was so proud! My Dad and I made copies of our score sheet and sent it to my Grandpa Chris. Rainbow is a place full of family memories for me.
My family and I still enjoy going to Rainbow Gardens. My favorite date to take to lunch is my Grandma Chris. She's an amazing, classy lady that used to take me when I was young. (sorry Husbandito...you lost- but I always bring home muffins, right?)

Most recent lunch Date. Aunt Lindy, Me, Grandma C.

Okay, now to the good stuff, the recipe.
Update: These yeild about 3 dozen muffins.

INGREDIENTS:

2 cup boiling water
5 tsp baking soda
1 cup shortening
2 cups sugar
4 large eggs
1 quart buttermilk
5 cups flour
1 tsp salt
4 cups All bran cereal
2 cups 40% bran flakes
1 cup walnuts, chopped

DIRECTIONS:
Boil 2 cups of water (I used my tea kettle and poured 2 boiling cups into a bowl) and add baking soda, set aside. In a separate large bowl whip shortening and sugar until light and fluffy. Add the eggs one at a time, scrapping down after each addition. Next, add the buttermilk, flour, salt and mix well. Add the soda water VERY slowly, folding it into the mixture. Next gently fold in the cereals and walnuts.

Muffin mix must sit in the refrigerator over night before baking. Muffin mix will last one week, covered and refrigerated.

Then next morning the batter will change from runny to an almost pudding like state, this means you're ready.

Preheat oven to 350 degrees F.

Prep your muffin tins by either greasing or using paper cups. Scoop enough batter into the tins to fill them up 1/4 of a inch from the top - about 1/2 cup. If you have time let them sit at room temperature for 15 minutes or so before baking.

Bake for 30 minutes, let cool 5 minutes and enjoy with honey butter!

Notes: The only thing I changed in the recipes instructions is how much to put in each muffin cup. I also don't bake all of the muffins at once. I currently have 1/2 half of this gigantic recipe sitting in my refrigerator and I bake them up after dinner or, if I have the day off work, first thing in the morning fresh for breakfast. YUM... Nothing like pulling these bad boys out of the oven and covering them in honey butter and eating the whole pan by yourself... DELISH!

Recipe: From Rainbow Gardens

More notes:
Honey Butter:
There is a delicious brand of honey butter in utah called "Utah's Own Honey Butter". If I had that brand of honey butter I would have used it- but I just don't love going to the grocery. So, I'm not saying this is the best recipe but I used:
1 stick softened butter
1/4 cup honey
1/8 tsp vanilla
I mixed it up with a fork and because I couldn't wait eat a hot muffin :) - husband thought it was tasty too.

October 04, 2012

Creamy Ham and Potato Soup

The temperature finally dropped into the 70's and my husband and I both had the same craving - potato soup! 

INGREDIENTS:
2 tbsp butter
1/2 yellow onion, minced
2/3 cup all purpose flour
6 cups 1% milk
4 - 5 baking potatoes
2 cups diced ham
1 cup sharp cheese, shredded
1 cup reduced fat sour cream
1/2 tsp garlic powder
1 tsp salt
1/2 tsp black pepper
1/4 tsp red pepper powder
1/4 c. green onions for topping
shredded cheese for topping
1 1/2 cup frozen broccoli florets (optional)

DIRECTIONS:
Wash, pierce and bake potatoes at 400 degrees for one hour or until tender. Let cool, peel and then coarsely mash and set aside.

In a large pan melt butter and then saute yellow onions. After the onions are translucent add the flour and let cook for 2 minutes, stirring constantly. Slowly whisk in the milk making sure the mixture is free of lumps. Let cook until thick and bubbly then add the mashed potatoes, diced ham, sour cream, garlic, pepper, salt and cheese.  Let cook until thoroughly heated but not boiling.

Serve in delicious bread bowls, garnish with green onions and cheese.

Notes: Sometimes I also add broccoli to the soup. I cook frozen broccoli florets half way. Then add them into the soup to finish cooking. 

Recipe: Adapted from Just Cook Already

October 03, 2012

Italian Bread Bowls

Another winner from Mel's Kitchen! If you can't tell by the previous posts on my blog I'm a carbaholic. Yup, I said it. I, Cass - The Gregarious Glutton, am addicted to Carbohydrates. Phew, I'm so glad I could open up to you guys.  Since that's out of the way let me introduce you to a vessel that you can eat; the delicious bread bowl.

Makes 6 - 8 Bread bowls

INGREDIENTS:
1 1/2 tbsp active dry yeast (use 1 tbsp instant yeast)
2 1/2 cups warm water
2 tsp salt
2 tbsp vegetable oil
7 cups all purpose flour (see notes)
1 tbsp cornmeal
1 egg white
1 tbsp water

DIRECTIONS:
In a large bowl or mixer, dissolve yeast in warm water. Let stand until creamy (about 10 min). Add salt, oil and 4 cups flour to the yeast mixture; beat well. Stir in the remaining flour , 1/2 cup at a time, beating well with an electric mixer at medium speed after each addition until a soft but not sticky dough forms; you may not use the full 7 cups. This dough needs to be a bit firmer so that the bread will rise up and not out. 

When the dough has pulled together turn it out onto a lightly floured surface and knead until smooth and elastic. Approx. 6 minutes. Lightly oil a large bowl, place the dough in the bowl and turn to coat with oil. Cover with a damp kitchen towel and let rise in a warm place until doubled in size; about 40 minutes. Punch dough down and divide into 6-8 equal equal portions. Shape each portion into a ball and lay on a lightly greased pan sprinkled with cornmeal. If desired slash the top of bread with a knife. Cover and let rise in a warm, draft free place for 35 minutes until doubled in size. 

Whisk egg white and water and brush over the dough.

Preheat oven to 400 degrees F and bake for 15 -18 minutes until golden brown. 

When you are ready to fill the bowls with your favorite soup slice off the top 1/4 of the bread. Take a knife and carve out the bowl. Make sure to save that bread and either slather it with butter or dip it in your soup. Mmmmm. 

Recipe: Directly from Mel's Kitchen Cafe

Stay tuned for the delicious Ham and Potato soup tomorrow!

September 29, 2012

Garlic Knots

Yeah guys, I wasn't kidding about the carb overload... 

Holy Moly, these bad boys will rock your world! ...however, you may smell like garlic for a week - WORTH IT.

I made these for my lovely sister in laws birthday. I looked at a ton of recipes and in the end I just decided to wing it and see what happened. 

INGREDIENTS:
1 - of your favorite french bread recipe, pizza dough recipe or pre-made dough ball.
4 cloves of garlic, pressed or finely minced
2 tbsp extra virgin olive oil
1/2 stick butter (4 tbsp)
1/2 cup fresh Italian parsley, chopped
1/2 cup shredded Parmesan
1/2 tbsp kosher salt (approx)
1 egg white
2 tbsp water

DIRECTIONS:
First, use your favorite french bread or pizza dough recipe. You can also buy pre-made (pizza) dough balls in the bakery of your local grocery store. Let the bread rise according to the specific recipe that you are using. When it comes time to punch down the dough, roll it out into small rectangle and cut into strips with a pizza cutter. When your dough is cut into strips tie them in a knot and place them on a slightly greased baking sheet. Cover them with a kitchen towel and let rise for 1 hour. 


Preheat oven to 400 degrees F. 

Next, grab a sauce pan, turn to medium heat and heat butter and oil. Throw in garlic and stir, making sure not to burn. Cook for about 3- 5 minutes until golden in color (this take the bitterness out of the garlic). Remove from heat and add the parsley. 

When the dough has risen to twice it's original size, beat egg white and water and brush the knots. 
Place in the oven and bake for 15 - 20 min (depending on knot thickness) until golden brown. 

When the knots are finished baking, brush or spoon the oil, garlic, parsley mixture over the top and then sprinkle with Parmesan cheese and kosher salt. 

Recipe: The Gregarious Glutton

September 27, 2012

Whole Wheat Cinnamon Raisin Bread

I've been looking for good wheat bread recipes and this fits the bill! I could barely wait to slice off a piece and slather it with a little salted butter. Oh. my. goodness.

INGREDIENTS:
1/2 c. warm milk
1/2 c. warm water
1 pkg yeast
1/2 cup + 2 tbsp sugar
6 tbsp softened butter, divided
1 c. whole wheat flour
2 c. all purpose flour
2 tbsp cinnamon, divided
1 1/4 tsp salt
1/2 c. raisins
1 egg + 2 tbsp warm water

DIRECTIONS:

In a small bowl combine warm milk, water, yeast and 2 tsp of sugar.  Let sit for 10 minutes until foamy.

While yeast is resting, combine the flours, 1/3 cup sugar, 3 tbsp softened butter, salt and 1 tbsp cinnamon in a large bowl. If you are using a mixer use the paddle attachment and mix on slow. Then, drizzle in the water, yeast, milk mixture while the machine is running. Increase speed to high and mix for about 6-8 minutes, until smooth and elastic. If you're working by hand add the water mixture to the dry ingredients and knead on a floured surface for 10 minutes until smooth. **I prefer to mix it by hand. I can get a better read on the dough and adjust the flour accordingly.

Place dough ball into a large bowl, sprayed with cooking spray. Cover with a cloth and let rise for 90 minutes in a warm, draft free place.

While dough is rising, mix remaining 3 tbsp butter, 1 tbsp cinnamon, 2 tbsp sugar in a small bowl until smooth.

After dough has doubled in size roll it out with a rolling pin on a lightly floured surface into a long rectangle. Spread the butter mixture all over the top of the rolled out dough. Sprinkle the raisins over top of the butter and roll up into a tight loaf.

Place dough in a greased pan and cover with a cloth and let rise for another hour.

Preheat oven to 350 degrees F. Whisk together the egg and warm water then brush all over the loaf. Bake for 40 minutes. Let cool, slice and enjoy!

Recipe: Adapted from Eat Live Run

September 22, 2012

Oatmeal Sandwich Bread

 So, first-thing's-first... thank you guys so much for visiting my blog! I hit 700 page views today! That is pretty dang cool! I see a lot of pinterest links and that is also pretty dang cool - makes a girl feel loved...Anywho, I was recently out of town and need to play catch up! So in the next few days you may be overloaded with carbs, because I am...overloaded with carbs. Oh, also I finally got my comments working. If you'd like to leave a comment on a post feel free (link on the bottom of the post), I'd love to hear from you!

This recipe is top notch! Don't be fooled by my sad, sad picture, I was running short on time and wasn't able to let it rise for the correct amount of time. It still turned out delicious!

The recipe below is by weight, if you don't have a cheapy little digital scale at home I suggest you go to the nearest hardware store and buy one for five bucks, OR, you can do as I did and walk out to the mountain of tools that your husband has accumulated and pick out your favorites.

 I "picked" this great little digital scale out of the tool pile, washed it up and it's been living in my kitchen ever since - SCORE!

INGREDIENTS:
 370 grams all purpose flour
48 grams old fashioned oats
14 grams sugar
1 pkt active dry yeast (not instant)
15 grams very soft butter (1 tbsp), unsalted
10 grams salt
1 1/3 cups warm water
Additional old fashioned oats for rolling

DIRECTIONS:
In a small bowl/cup add the warm water, a pinch of sugar and the active dry yeast. Set aside until yeast has become foamy.

In a large bowl, or bowl of a mixer, mix together the flour, oats, salt and sugar. Add the soft butter and slowly pour in the yeast and water mixture.

Mix with either your hands or using a mixer with a dough hook attachment until the dough is smooth. It will be sticky. By hand, will take eight minutes or so of kneading. If you're using a mixer, it will take approximately four minutes on high speed. (I personally like hand kneading)

Cover bowl with dishcloth and set in a warm place to rise for 1 - 1&1/2 hour(s), until the dough has doubled in size.

When the dough has doubled, turn it out onto a lightly floured surface and punch down to release any air bubbles. Then cover the dough and let it rest for 20 minutes on the counter.

Form your dough into a small log and roll in oats. Place the loaf into a greased bread pan, cover with a cloth and let rise again for 45 minutes. While dough is rising, preheat oven to 475 degrees F.

When you are ready to bake, reduce oven temperature to 375 degrees F and place the loaf in the oven. Do not open the oven! (it will release steam!) Cook for 45 minutes. When done the loaf should be a rich golden brown. If you're unsure if the bread is finished keep it in for five minutes longer.

Notes:
I wish I would have let mine rise the full amount of time, next time I will and believe me, there will be a next time!

Recipe: Exact recipe from Eat Live Run
Photo credit for scale here

July 27, 2012

Zucchini Bread


If you're like me you've got zucchini coming out of your ears! It's amazing how fast they grow. This is another wonderful recipe from Mel's Kitchen Cafe that I have used for a year or two. The only change I have made to her recipe is putting a frosting/glaze over the top.

INGREDIENTS:
1 pound zucchini ( approx. 1 to 1&1/2 cups shredded and wrung out)
2 cups flour
1 tsp baking powder
1 tsp baking soda
1 tsp salt
1 tsp ground cinnamon
1 tsp allspice
1 1/2 cups granulated sugar
2 large eggs
1/4 cup plain yogurt (not fat-free)
1 tbsp fresh lemon juice or sour cream
6 tbsp butter, melted

DIRECTIONS:
Adjust oven rack to center position and preheat oven to 375 degrees. Coat 9 inch x 5 inch loaf pan with cooking spray. (Mel and I both use Baker's Joy brand spray. It's awesome)

Prepare the zucchini by cleaning, cutting off ends, seeding (if necessary) and shredding. In the original recipe it says to finely shred the zucchini however, I find that using a cheese grater is easy and I personally like the larger pieces of zucchini in the bread. With a clean kitchen towel wrap up the shredded zucchini and wring it out over the sink to squeeze out all the excess water. You should have about 1 - 1 1/2 cups of dry zucchini. Set aside.

In a large bowl, whisk together the flour, baking soda, baking powder, cinnamon, allspice, and salt. In a smaller bowl, mix the sugar, yogurt, eggs, lemon juice or sour cream, and butter until combined.

Gently fold the yogurt mixture and zucchini into the flour mixture. Use a rubber spatula to fold the ingredients together until just combined. Transfer the batter to the prepared pan.

Bake 45 - 55 minutes until golden brown and a thin knife or skewer comes out clean when testing the center. Let cool for 10 minutes and turn out onto a wire rack to cool for at least one hour. Store well covered for at least 3 days.

This is fabulous with just butter however, I've added some frosting/glaze to the bread as well.

Glaze/frosting is a simple powdered sugar and butter frosting.
Melt 1/2 stick of butter or margarine
Add 1 tsp vanilla
Whisk in 1 1/2 - 2 cups of powdered sugar - add more if too thin.
If it's too thick add small amounts of milk until you reach your desired consistency.

NOTES:
Mel suggests using that if you are short on zucchini to add shredded carrots to make up the difference.(yum)

This recipe is for 1- 9x5 loaf. However, you can also get 2 loafs by using smaller loaf pans 8.5x4.5 and filling them up equally. This doesn't have a significant change in bake time. I checked mine 45 minutes and they were perfect.  If you are making this bread into one loaf  it will create a beautiful dome on top of your bread. Using 2 pans will not create such a dome but then there is more to share!

Recipe: Slightly adapted from Mel's Kitchen Cafe


July 15, 2012

Herb Focaccia Bread


This is an amazing recipe! It takes under and hour to make this bread and when it comes out of the oven you'll have to stop yourself from eating it all before it hits the table. I think this bread is best served hot and would be awesome dipped in some good olive oil and balsalmic vinegar.

INGREDIENTS:
2 3/4 cups all-purpose flour
1 tsp salt
1 tsp sugar
2 1/2 tsp instant yeast
1 large clove garlic, minced
3/4 tsp dried rosemary or 1 tbsp fresh rosemary, chopped
1/2 tsp dried thyme
1/2 tsp dried oregano
1/2 tsp dried basil
1 tbsp olive oil
1 cup warm water

In a large bowl or mixer, mix flour, salt, sugar and yeast. Mix in the garlic and herbs. Pour in the water and olive oil and mix until the dough comes together. Next knead by hand or with a mixer and dough hook attachment for about 4-6 minutes. The dough will be soft and pliable.

Cover the bowl with lightly greased plastic wrap and let rise for 30 minutes. Punch down and let rest for 5 minutes.

Preheat oven to 425 degrees. Lightly grease a large, rimmed baking sheet. With your hands, spread out the dough to approx. 8"x10" rectangle. Use your fingers to make indentations over the dough, about every 1/2 inch or so. Lightly brush the dough with olive oil and bake for 15 to 20 minutes, until golden brown.

Immediately after removing from the oven, stir one tablespoon of olive oil and 1/2 teaspoon* salt and brush over the surface of the hot bread.

NOTES:
*I used a heaping 1/4 teaspoon last time I made it and it was great. The 1/2 teaspoon was a little much for some people.

Recpie: Directly from Mel's Kitchen Cafe